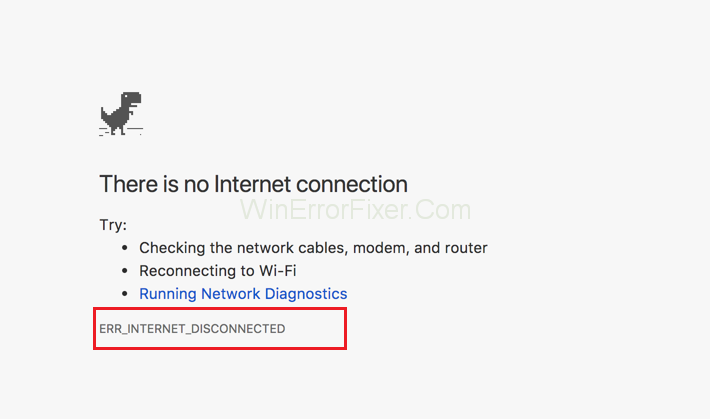
ERR_INTERNET_DISCONNECTED is a familiar error, for users who do not search with a proper internet connection. It may occur due to various reasons. Some of them are as follows. One is an improper connection of the internet. This can be due to weak signals or bad weather conditions. The other reason is when the user does not have his internet connection turned on. Which means that he starts searching the content without realizing he hasn’t turned on the internet connection.

Various sources of this net connection include mobile data, WiFi, tethering and HotSpot. All these are related to sharing the internet. When the users find ERR_INTERNET_DISCONNECTED error message, it may irritate them as they feel that their search result is not found. They might even feel that they are being restricted due to certain reasons or conditions. Let us now see how this problem can be solved.
How to Fix ERR_INTERNET_DISCONNECTED Error
It is very important to avoid ERR_INTERNET_DISCONNECTED error. Here, we follow a few sets of procedures or instructions that are to be followed. This helps us to stay away from any mishaps that may occur due to improper network connection.
The main thing to do first is to identify or to recognize the main root cause. Because from here, only the method of prevention of such errors can be avoided.
Let us look into this in detailed. The main reason for ERR_INTERNET_DISCONNECTED error can be the antivirus software. This may install unwanted software that can be harmful to our system or the computer. While we use the Google Chrome web browser, we ourselves can recognize the errors and correct them. Some of the methods are discussed in detailed.
Solution 1: Clearing Browsing Data
Clearing the browsing data means to clear our search history. It means that we must delete all our searches. In other words, it means to erase all the searches done in the search engine. It is advised to clear cookies and cache as they can make the browser to work faster. To make our work easier the command, Ctrl + Shift + Del is entered so that our search history can be cleared
To make it as a long step by step process, the following procedures are to be followed. Go to the menu bar of chrome, and click the settings option. Later click the advanced option. It helps us to explore more about the related item. Later come down and click the clear browsing data option. It opens up a new dialogue box. Now all the contents and the images that have been searched gets cleared.
Clear Browsing Data on Google Chrome
Let us now look, how can we clear the data browsed on Google chrome. It helps us to clear the web addresses and all the other pages that have been visited earlier. There are some handlers in chrome. These are the external applications, used to open certain links. Look in detail into the download history.
It contains all the history related to our previous search about the contents we were looking for. Under the settings option, go to more tools option. Here we have all the facilities to clear our browsing sat very quickly.
Clear Browsing Data on Firefox
It is important to clear the browsing data in Firefox. Some of the steps to be followed are as follows. Go to the private browsing category and use Firefox without saving the content. It helps us to stop temporarily the Firefox to store our history of searches. Browsing and download history plays a very crucial role.
The browsing list is a site that gives all the information about the user’s browsing history. The form autocomplete is a page that includes the details of all the items which we’ve entered in our searches. The time range to clear shows us how much time the browser has to clear. Now, the custom settings for history will clear the contents.
Solution 2: Fix Local Area Network Settings
Here are some steps to be followed while we fix the local area network connection settings. First, go to the settings options and click the Control Panel. Here, the network and internet option is enabled. Further, click the network and sharing center. This center acts as the control panel for all the networking fields or areas.
The main purpose of this is to share the internet connection. Later on a closer look at the left side column of the screen, there appear the change adapter settings. It has to be selected. We find the local area connection disabled. If the local area network connection is not there, it may lead to the following risks. Such as, there might not be a valid UP configuration. Ethernet is another name for the local area network.
Solution 3: Reinstall Antivirus
There are several steps followed in this process. The standard way, control panel and software Uninstall Utility. In case of uninstalling through the standard way, it includes some basic steps to be followed.
First, to ensure that charge in the battery is at least 20 percentage. Next step is saving the files and documents. Here comes the step to or disable the app permanently, since disabling is very important. Later the steps involve the user to agree to various terms and conditions and the procedure is done. Now comes the uninstallation through the control panel. The first one is to search “CP” in the Cortana search.
The items are minimized and kept side. The program files are opened, and the procedure is by following the instructions accurately. Now using the official file, we uninstall this software. From the official link, the file is downloaded. Then to save the file, the similar file is selected, and finally, the procedure is completed.
Solution 4: Delete WLAN Profiles (Wireless Profiles)
WLAN refers to a wireless local area network. To delete the wireless local area profiles, we follow some set of rules and regulations. First, press the network icon that is found on the right corner at the lower screen.
Later move on to the network settings. Here, the manage WiFi settings is enabled, so that appropriate connection is given to them. Now select all the contents that have to be deleted.
Conclusion
If all the above-mentioned steps are followed, we can prevent the Err_Internet_Disconnected in future and have a safe and secured search for a lifetime.