How To Setup static IP address on Windows 10 PC (Updated 2019)

If you are looking for Share files or A printer on your local network or trying to configure port forwarding It’s important to Setup a static IP address on your machine. Here this post we discuss, What is IP address, different Between Static IP and Dynamic IP and how to set a static IP address on Windows 10.
What is IP address?
IP address, short for Internet Protocol address, is an identifying number for a piece of network hardware. Having an IP address allows a device to communicate with other devices over an IP-based network like the internet.
Technically speaking, an IP address is a 32-bit number that signifies the address of both the sender and receiver of packets on a network. Every computer on your network has at least one IP address. Two computers on the same network should never have the same IP Address. If two computers end up with the same IP address neither will be able to connect to the Internet. This will cause windows IP confliction.
Static IP vs.Dynamic IP
IP addresses are divided into two main types: Static and Dynamic IP address.
Static IP addresses are those types of IP address that never change once they are assigned to a device on a network. A static IP address is usually specified manually by the user. Such configuration is traditionally used in small networks, where the DHCP server is not available and often is not required. Dynamic IP address changes each time the device logs in to a network. A dynamic IP address is assigned by the DHCP server. Usually, it is your router.
| Class | Address Range | Supports |
| Class A | 1.0.0.1 to 126.255.255.254 | Large networks with many devices |
| Class B | 128.1.0.1 to 191.255.255.254 | Medium-sized networks. |
| Class C | 192.0.1.1 to 223.255.254.254 | small networks (fewer than 256 devices) |
| Class D | 224.0.0.0 to 239.255.255.255 | Reserved for multicast groups. |
| Class E | 240.0.0.0 to 254.255.255.254 | Reserved for future use, or Research and Development Purposes. |
Setting up Static IP Address on Windows 10
There are various ways to Setup and configure static IP address on Windows 10, Using network configuration windows, Using windows command prompt, From windows Settings etc.
Setup Static IP Address From Control panel
- Open Control Panel.
- Click on Network and Internet, Then Network and Sharing Center.
- On the left pane, click the Change adapter settings.
- Right-click the Active network adapter and select Properties.
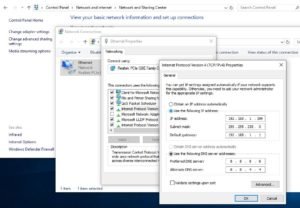
- Double click on Internet Protocol Version 4 (TCP/IPv4) option.
- Here Select radio button “Use the following IP address option”
- Type IP, Subnet mask and Default Gateway Address.
- And Type Default DNS address 8.8.8.8 and 8.8.4.4.
Note: Your Router IP address is Default Gateway Address, It mostly 192.168.0.1 or 192.168.1.1
Click ok and Close to making save the changes, That’s all you have successfully configured Static IP Address for Windows 10 PC.
Assign static IP address using Command Prompt
Search for Command Prompt, right-click the result and select Run as administrator to open the console.
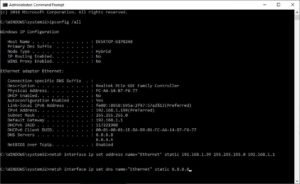
Type the following command to see your current networking configuration and press Enter:
ipconfig /all
Under the network adapter note the name of the adapter as well as the following information in these fields:
- IPv4
- Subnet mask
- Default Gateway
- DNS Servers
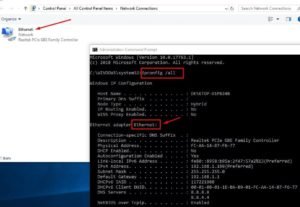
Also, Note the connection name in the output. In my case, it is “Ethernet“.
Now To set a new IP address, execute the following command:
netsh interface ip set address name="connection name"
static yourip_address subnet_mask default_gateway
netsh interface ip set address name=”Ethernet” static 192.168.1.99 255.255.255.0 192.168.1.1
And to Setup the DNS server address use following command.
netsh interface ip set dns name="connection name" static dns_server_ip_address
netsh interface IP set dns name=”Ethernet” static 8.8.8.8