On Windows 10, you can immediately transfer virtually any file format and folders from a USB flash drive (thumb drive) to your PC, and you can export files to removable storage devices to share them with other person or create a copy for backup point of view.
In this Windows 10 guide, we learn the easy steps How to transfer files from a USB flash drive to a PC in Windows 10.
How to import files from USB flash drive to Windows 10
To copy files from a USB flash drive to your computer running Windows 10, use these steps:
- Open File Explorer.
- Click on This PC from the left pane.
- Connect the removable drive to your PC’s USB port.Quick tip: If you get a toast notification, click it and select the Open folder to view files option.
- Under the “Devices and drives” section, double-click the USB flash drive to see its data.
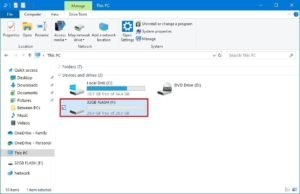
- Select the files and folders.
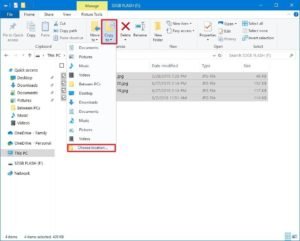
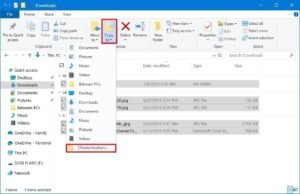
- Click the Copy to button from the “Home” tab.
- Click the Choose location option.
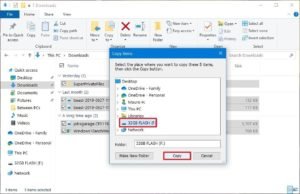
- Select the folder to import files from a flash drive to your PC.
- Click the Copy button.

Once you complete these steps, the files will copy from the removable drive to the computer.
When importing and exporting files, it’s usually safer to perform a “copy” instead of a “move” action to prevent losing the files if there’s a problem during the transfer. However, once you verified that the files had been copied successfully, you can select and delete all the contents from the USB flash drive.
Importing pictures to Photos app
If you have a flash drive with a bunch of pictures, you can quickly copy them to your computer using the import option available in the Photos app.
To import pictures using the Photos app, use these steps:
- Open Photos.
- Connect the removable drive to your PC’s USB port.
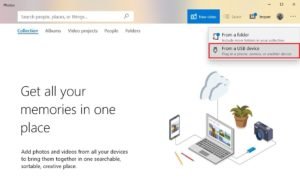
- Click the Import button from the top-right.
- Select the From a USB device option.
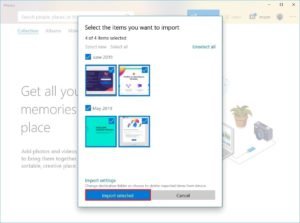
- (Optional) Click the Unselect all option to select only the images that you want to import.Quick tip: You can also click the Import settings button to change the import destination folder, grouping, and to decide whether items in the flash drive should be deleted after they’re moved to the device.
- Click the Import selected button.
After you complete the steps, the pictures in the removable media will be imported to the Pictures folders inside the OneDrive folder.
How to export files to USB flash drive from Windows 10
To export files from your computer to a USB flash drive, use these steps:
- Open File Explorer.
- Click on This PC from the left pane.
- Connect the removable drive to your PC’s USB port.
- Under the “Devices and drives” section, open the drive with the files that you want to copy.
- Select the files and folders.Quick tip: You can use the Ctrl + A keyboard shortcut to select all the files. Or press and hold the Ctrl key and click with the mouse the files that you want to select.
- Click the Copy to button from the “Home” tab.
- Click the Choose location option.
- Select the folder to export files from your PC to a flash drive.
- Click the Copy button.
Once you complete the steps, the files that you selected from your computer will transfer to a USB thumb drive. (If you no longer need the transferred files, you can always delete them from your computer.)
If you don’t have enough space to export your files, you can always purchase another removable drive, such as the SanDisk Extreme Go (CZ800), which comes with 128GB of space to store large files and small backups.
This guide is focused on beginners, and as such, we’re showing one of the simplest methods to transfer files from a removable drive to a computer, but it’s worth noting that there are countless other ways that you can use to transfer files from one storage device to another.