If you are using Windows 10, 8, or 7 and a process called Service Host: Local System is consuming a large amount of CPU, Disk, or Memory, then read the below post to look for the solution to fix the Service Host Local System High Disk problem.

What is Service Host: Local System?
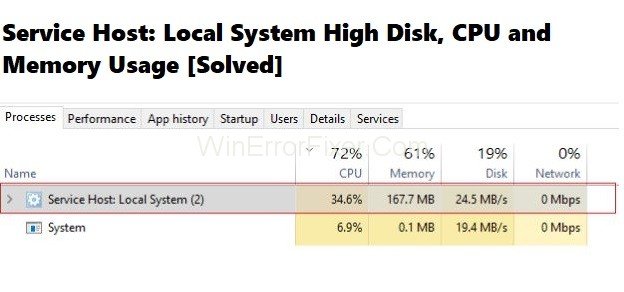
When you press the Ctrl+ Alt+ Del keys together from your keyboard, the Task Manager window will appear. Then, click on the Processes tab and look for the Service Host related processes, like Service Host: Local Service, Service Host: Local System (Network Restricted), Service Host: Network Service, and many more.
Service Host: Local System is the cause of the 100% disk usage in Task Manager. So what the term is, and why is it using a large number of resources? Below is the explanation.
System Host: Local System is a package of system resources. Many processes like Windows Auto Update and many system services would be running under it. Thus, it takes a considerable amount of disk, RAM, or bandwidth. Many users have reported this issue where 95% CPU is used by a process called Service Host: Local System.
Solving the Issue Service Host: Local System High Disk Usage, CPU Usage or Memory Usage
Many solutions are devised to solve the problem of Service Host: Local System high disk usage, CPU usage, or memory usage. Go through the below solutions one by one to fix the problem:
Solution 1: Restoring Hard Drive Health and Optimizing the System
At first, you need to Download EaseUS free partition manager on your system and then install it. Then, follow the below steps for hard drive repair and optimization of the system with the software:
1 – For restoring hard disk health back to normal state:
Step 1: To start with, open the EaseUS Partition Master on your system. Now, find the disk and right-click the partition you want to check. Then, select the “Check File System.”
Step 2: Then, in the Check File System window, tick mark the option “Try to fix errors if found” and click on the “Start” button.
Step 3: Checking of the partition file system on your disk will start. After the checking is completed, click on the “Finish” button.
2 – Optimizing the system by removing redundant network data, files, and system logs:
Step 1: Under Tools in EaseUS Partition Master, click on System Optimize.
Step 2: Then, one by one click on options for Junk File Cleanup, Large File Cleanup, and Disk Optimization. These solutions will definitely help to get rid of disk, CPU, and memory usage.
Solution 2: Disabling the Service Host Local System Tasks
Step 1: At first, press the Ctrl + Alt + Del keys together from the keyboard and open the Task Manager. Then, under the Processes tab, expand the option Service Host: Local System to check the items which are using more disk, CPU, or memory.
Step 2: After searching for the items that are consuming your computer resources, right-click it, and choose the option “End Task.”
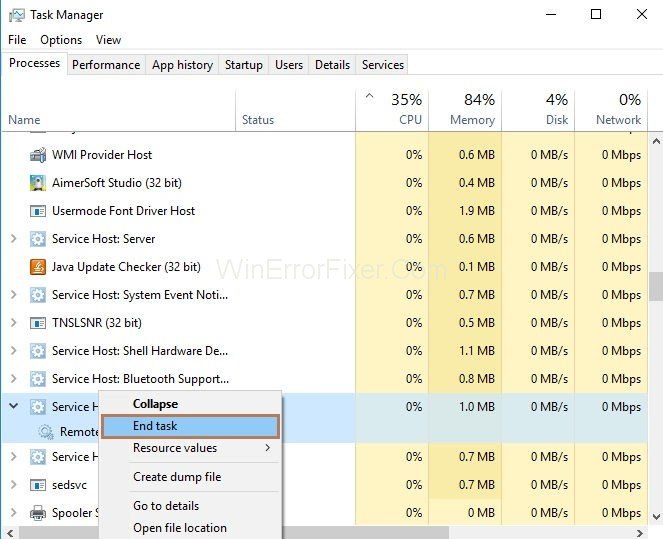
Step 3: Repeat the process unless and until all the suspicious tasks are suspended. Side by side, keep on checking whether the CPU, disk, or memory usage is decreasing.
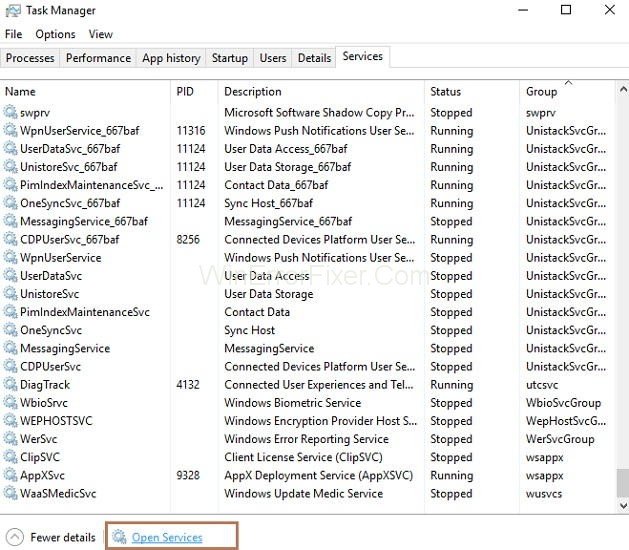
Step 4: Once you have looked for the item that is causing the problem, right-click it, and choose the option “Open Services.”
Step 5: Then, look for the service with the same name and right-click it. Now, select Stop.
Step 6: Double-click the service that is causing the problem and then from the drop-down, selects the Startup Type as “Disabled.” Then, press the “Apply” button and “Ok” button.
Solution 3: Disabling Backup Intelligent Transfer Service
Step 1: At first, press the Ctrl+Alt+Del keys together from the keyboard and open the Task Manager. Then, go to the “Services” tab.
Step 2: At the bottom of the Services tab, click on the “Open Services” button.
Step 3: A new window showing all the services will appear. Search for the service “Background Intelligent Transfer Service.” After that right click on it and click on the “Stop” button.

Solution 4: Disabling the Superfetch Service
Superfetch make a note of apps that you use more often and mark them as “frequently used.” Disabling the Superfetch Service might help you.
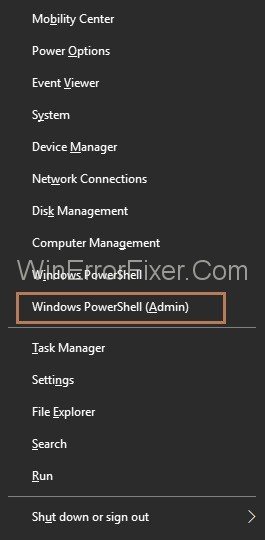
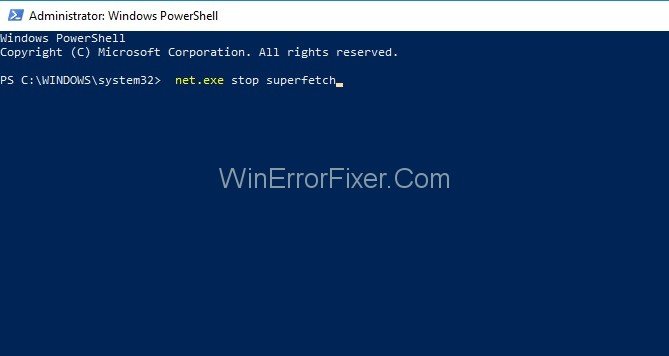
Step 1: At first, press the Windows+X keys together from your keyboard. Then, choose the option “Command Prompt (Admin).” If this option is not available, you can select the option “Windows Powershell (Admin).”
Step 2: Then type the command net.exe stop Superfetch and press Enter key.
Solution 5: Disabling Automatic Updates
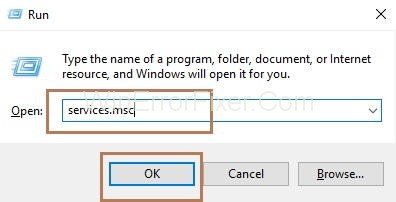
Step 1: At first, open the Run dialog box by pressing Windows+ R key together from your keyboard. Type “service.msc” in the box and click on the “Ok” button.
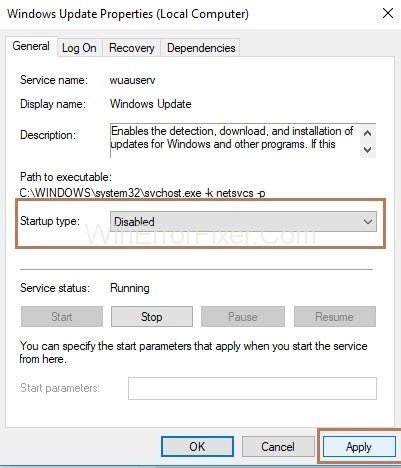
Step 2: A window will appear, showing all the services. Now, find the “Windows Update” service and double-click on it. Then, Windows Update Service Properties window will appear.
Step 3: Click on the “General” tab and then from the drop-down menu of “Startup type,” choose the option “Disabled.” At last, for saving the changes made, click on the “Ok” button.
Step 4: Once Windows Update is disabled permanently, go through the solution two and End task the process “Service Host Local System.”
Similar Posts: